Ilustrative ocean road hero image about surf community

The Definitive Resource for Surf Gear & Tech


Category: Uncategorized

  • Solo Surf Travel Guide: 3 Safe Regions for an Epic Strike Mission

    Solo Surf Travel Guide: 3 Safe Regions for an Epic Strike Mission

    The Call of the Horizon: Why You Must Go Solo

    There is a specific, sacred moment that every solo surf traveler knows. It happens when you are sitting on the tailgate of a rented truck, the scent of coconut wax mingling with the metallic tang of a rusty tailgate, watching the first light of dawn paint the horizon. The air is cool, the water is a glass sheet, and the only sound is the rhythmic, heavy thud of a cleaning-set closing out on the reef. You have no one to check in with, no companion arguing about where to eat, and no coordinator diluting your focus. It is just you, your board, and the ocean.

    In my twenty years of chasing swells across the globe, some of my deepest transformations didn’t happen when I was traveling with a crew. They happened when I was entirely alone, forced to read the ocean’s subtle rhythms without a safety net. Traveling solo makes you a better waterman because it strips away the noise. You become highly observant of the local currents, the shifting winds, and the social dynamics of the lineup.

    How to pack surfboards for travel: Essential two-board quiver setup and technical rail protection inside a padded board bag.

    If you are preparing for your first solo strike, or looking to refine your nomadic routine, you need a solid foundation. Before you book that flight, make sure to read The Ultimate Surf Travel Guide to lock down your general wave mechanics, fitness prep, and travel logistics.

    When you travel solo, the ocean becomes your primary partner. This relationship requires absolute humility. I remember a trip to a remote reef pass in Indonesia where I pearled on my first wave, filled my ears with sand, and lost my board to a sharp outcrop of fire coral. With no friend on the shoulder to paddle over and laugh or offer a hand, I had to swim through the impact zone alone, calculating the rip currents with a racing heart. That afternoon taught me more about self-reliance than a decade of surf school. Solo surf travel is not merely a vacation; it is an active meditation and a test of character.

    Choosing Your Sanctuary: Solo-Friendly Surf Destinations

    Choosing the right destination as a solo traveler involves a delicate balance. You need waves that match your capability, a community vibe that allows you to plug in or stay isolated as you please, and reliable infrastructure so a broken fin or a mild case of reef rash doesn’t turn into a survival scenario. You want to avoid spots with notoriously hostile localism or setups that require a two-boat charter just to reach the take-off zone.

    In my experience, certain zones of the world are practically custom-built for the solo surf. Central America offers warm water and highly accessible beach breaks, while Europe provides cultural richness alongside rugged, consistent beach and point breaks. Below is a comparative breakdown of three premier regions for the solo traveler, based on my personal trial-and-error over the years.

    Region / DestinationWave Type & DifficultySolo Social InfrastructureSafety & Localism LevelBest Season
    Guanacaste, Costa RicaMellow beach breaks to fast reefs (Beginner to Advanced)Excellent. Dozens of surf hostels, shared shuttles, and beachside cafes.Very safe; welcoming lineups with minimal aggressive localism.May to November (Green Season has the biggest swells)
    Ericeira, PortugalHeavy reef passes, point breaks, and beach sandbars (Intermediate to Pro)High quality. Modern surf camps, co-working spaces, and ocean-minded cafesSafe landside; lineups can be highly competitive at prime reef breaks.September to May (Autumn is the golden window)
    Bukit Peninsula, BaliWorld-class, fast reef breaks over shallow coral (Intermediate to Expert)Unmatched. Incredibly easy to meet people, cheap scooter rentals, endless surf camps.Relatively safe; high crowd factor requires patience and deep etiquette knowledge.April to October (Dry season trade winds)

    When selecting your destination, be honest with yourself about your current skill level. A solo trip is not the time to test your limits on a heavy, sucking reef break if you have only ever surfed soft beach breaks. If you are traveling alone, a shoulder injury or a severe wipeout becomes significantly more complicated to manage. Choose a location where you can confidently navigate the water on your worst day, not just your best.

    The Art of Solo Logistics: Pack Light, Pack Smart

    When you are traveling alone, you are your own sherpa. Navigating foreign bus terminals, walking down dirt roads, or haggling with taxi drivers becomes a nightmare if you are hauling a massive triple-board coffin bag along with a giant suitcase. Over the years, I have streamlined my gear down to a science. The goal is to pack everything you need to survive and repair your gear, without carrying a single ounce of dead weight.

    Solo surf in Ericeira Portugal: A perfect, heavy reef break wave peeling under crisp offshore winds at sunrise.

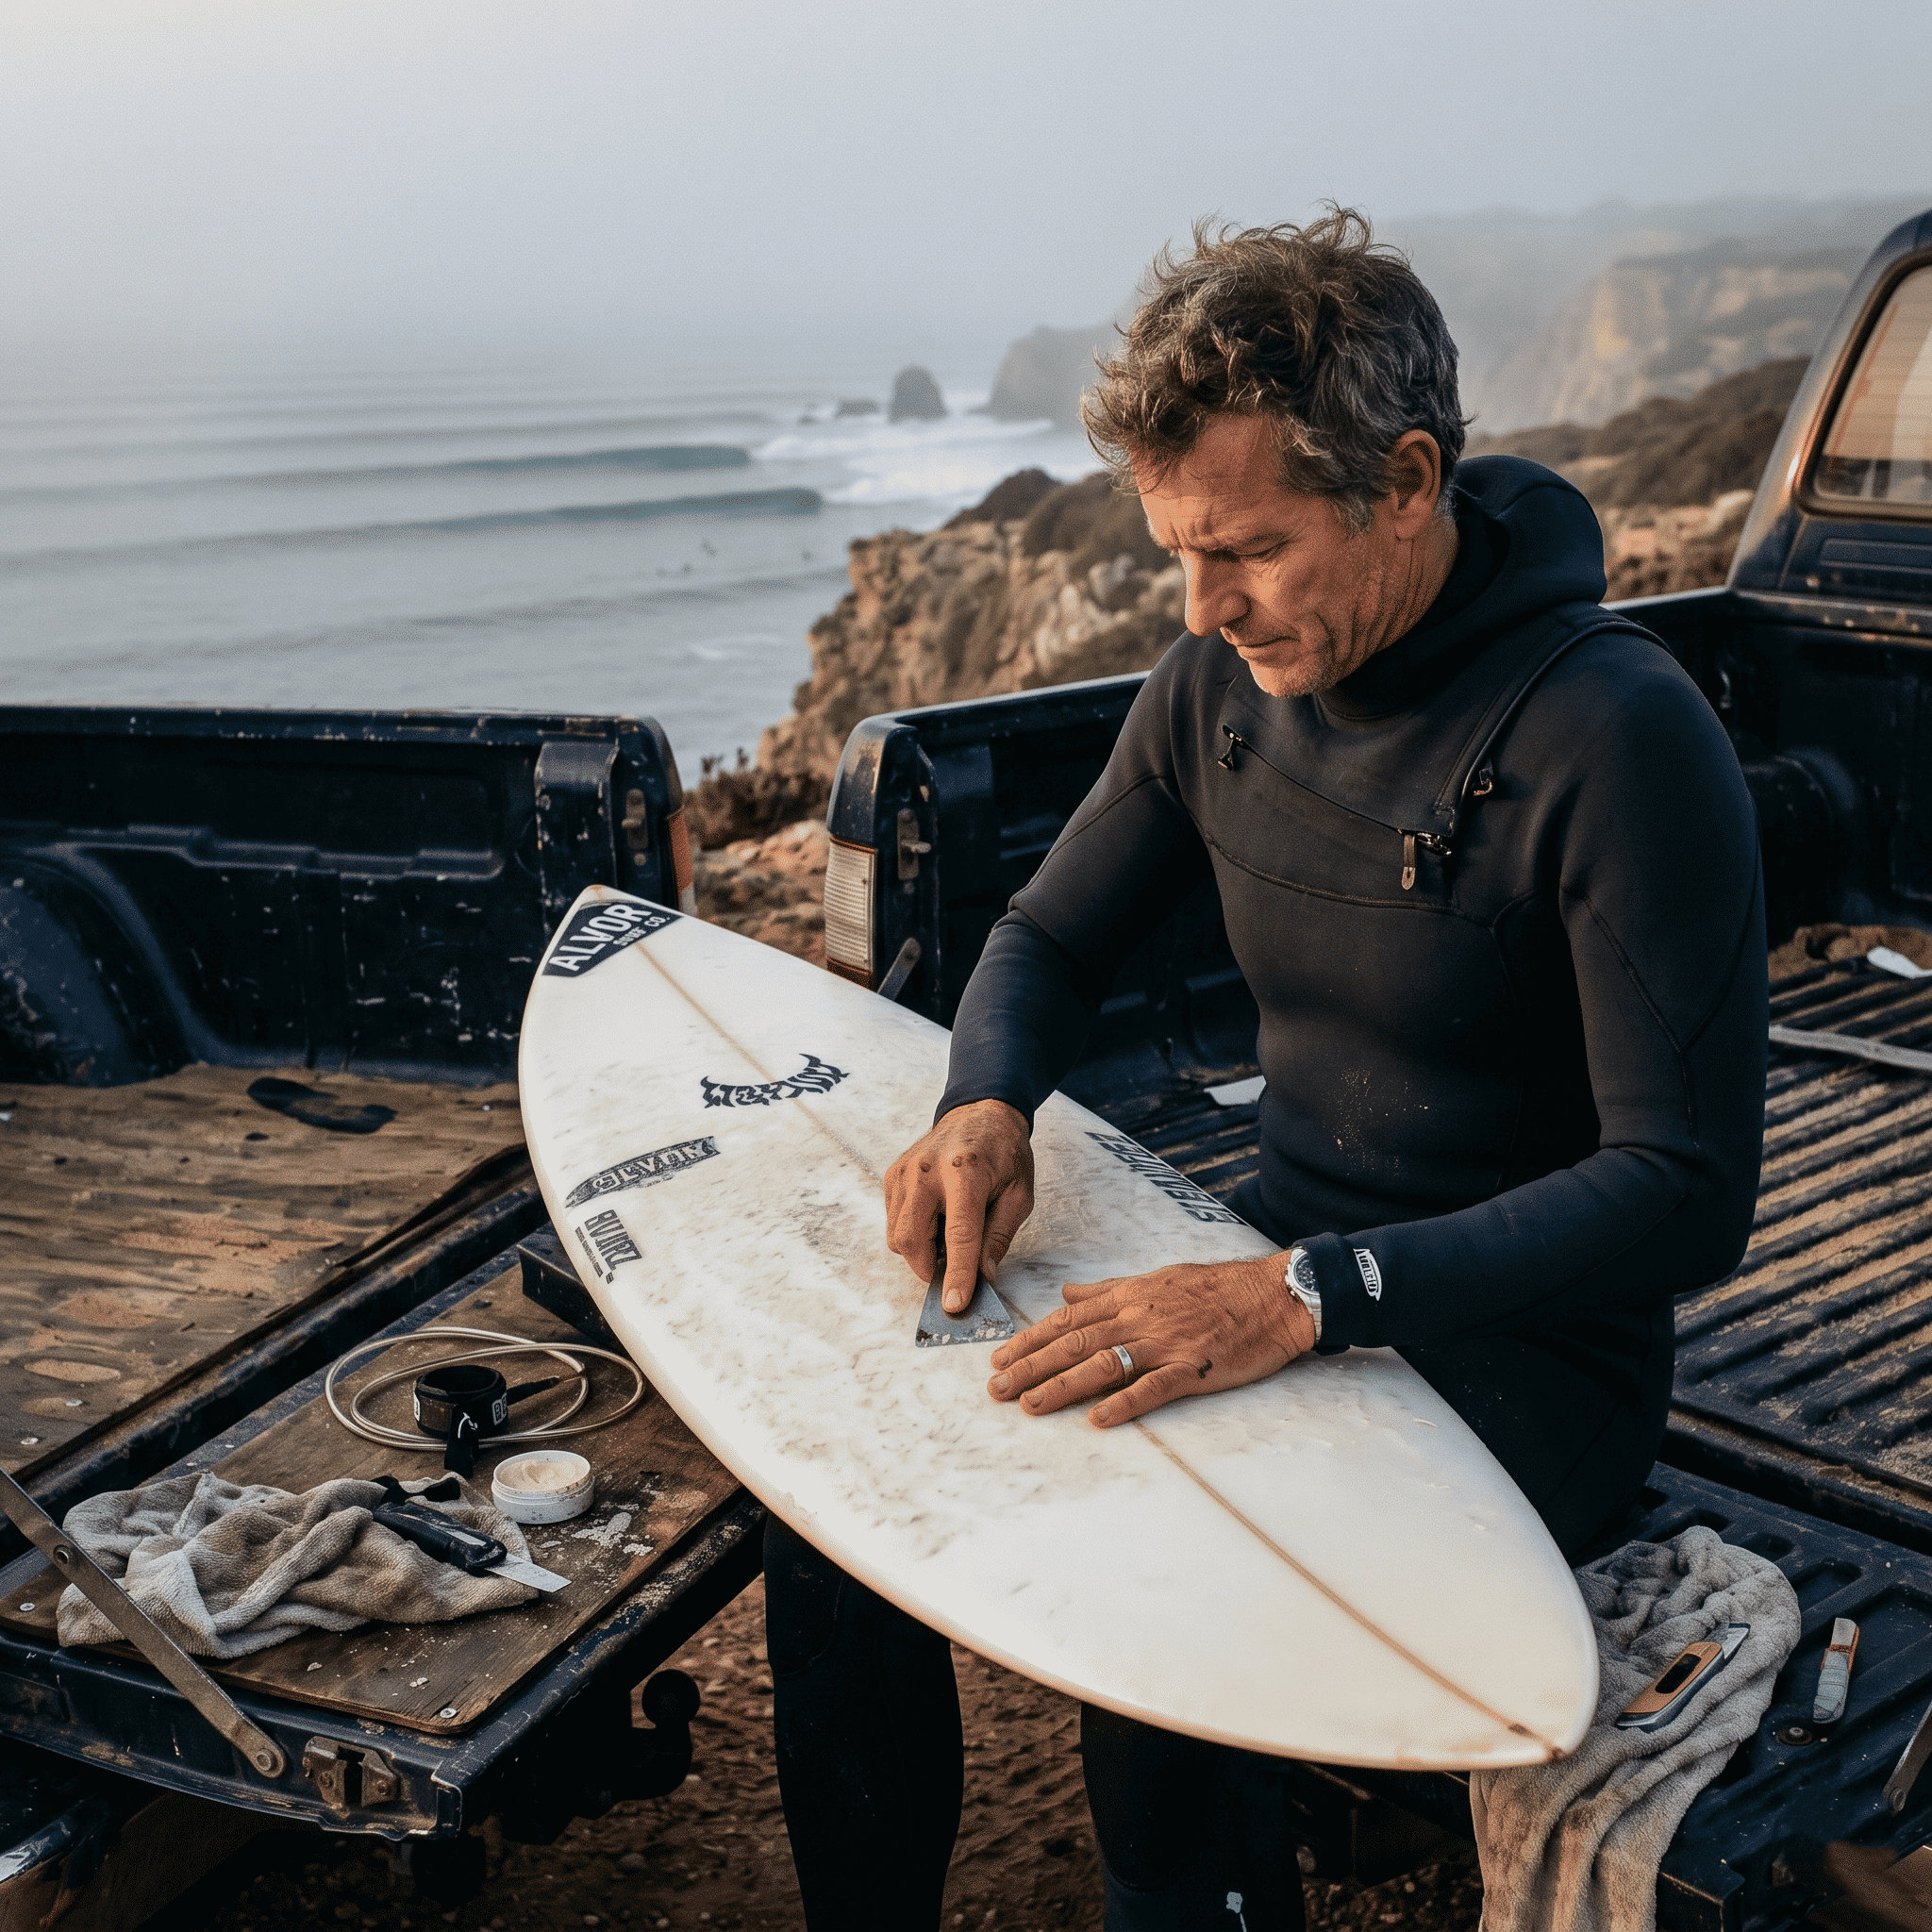
    First, let’s talk board selection. For a solo trip, a two-board quiver is the sweet spot. A high-performance daily driver for average-to-good conditions, and a slightly step-up board with extra volume for when the swell pulses. If you only bring one board, a single ding can ruin your entire trip. If you bring three, you will struggle to fit into standard sedan taxis or local tuk-tuks. Wrap your boards in bubble wrap or beach towels inside a lightweight, wheeled board bag. Pro-tip from my personal travels: slice pool noodles lengthwise and slip them over the rails of your surfboards before packing. It adds virtually zero weight but prevents 90% of airline transit damage.

    • First Aid & Wilderness Medical Kit: Pack suture strips, antiseptic wash, broad-spectrum antibiotics, ear drops (swimmer’s ear can ruin a trip in three days), and plenty of waterproof medical tape.
    • Ding Repair Essentials: Do not rely on local shops. Bring a small tube of UV-cure solar resin, a sanding pad, and heavy-duty duct tape or specialized ding tape for quick fixes between sessions.
    • The Travel Essentials Bag: A high-quality dry bag (20L) is invaluable. It keeps your passport, phone, and wax dry during boat transits or tropical downpours.
    • Fin Management: Bring a spare set of fins, a high-quality fin key (keep it on your keychain), and extra fin screws. Losing a fin screw in a remote town can sideline you for days.

    When I tested various packing methods in remote areas of Morocco, I realized that less truly is more. If you can carry your board bag in one hand and a single backpack on your shoulders, you retain your mobility. This mobility is your safety net. It allows you to quickly change hotels, jump onto a boat, or walk away from a sketchy situation without feeling anchored down by excessive gear.

    Lineup Diplomacy: Navigating Foreign Crowds Alone

    Entering a new lineup alone is an exercise in social psychology. When you arrive at a surf break with a group of friends, you naturally bring an energetic footprint that can feel invasive to the locals. When you paddle out alone, you are a single observer. This is your greatest asset. Lineup diplomacy is about showing respect, reading the room, and earning your place in the rotation through patience rather than aggression.

    My golden rule is the “Twenty-Minute Rule.” When you arrive at a new spot, do not immediately wax up and throw yourself into the water. Sit on the beach, find an elevated vantage point, and watch the water for at least twenty minutes. Look for the take-off zone, the sweep of the current, the hidden rock shelves exposed on the sets, and the social hierarchy of the lineup. Identify who the local heavy-hitters are, who is catching the most waves, and where the safest shoulder is located.

    When you finally paddle out, do not head straight for the peak. Sit on the shoulder. Smile, nod to the closest surfer, and keep your hands quiet on your board. Do not paddle for the first set wave that comes your way, even if you are in the perfect spot. Let it go. Show the crowd that you are not there to vacuum up every wave. When you do eventually paddle for a wave, commit 100%, ride it cleanly, and kick out safely without putting anyone else in danger. One well-ridden wave executed with style and respect will earn you more access to the peak than an hour of aggressive jockeying.

    Solo Surf lineup etiquette: An experienced surfer observing ocean currents and wave patterns from a cliff before paddling out alone.

    Overcoming the Solo Mindset Challenges

    Let’s speak plainly: solo travel is not always a glossy postcard. There will be evenings when the wind turns onshore, the swell drops, and you are sitting in a cheap room listening to the hum of a mosquito net, feeling incredibly lonely. The mental game of solo surf travel is just as demanding as the physical challenge of paddling through an eight-foot beach break.

    To combat the inevitable dry spells of loneliness, you must learn to bridge the gap between solitude and community. Surf camps and co-living spaces are fantastic hubs for solo travelers. They offer a shared dinner table where you can swap stories about the morning’s glass-off, find surf buddies to split the cost of a boat charter, or simply connect with like-minded souls. However, do not let the comfort of a communal space prevent you from experiencing the local culture. Some of my most treasured travel memories involve sharing a simple meal of grilled fish with local fishermen who showed me secret pathways to empty setups

    Use your solo time on land to rest, read, study the weather charts, and connect with your environment. The silence of a solo trip is where the magic lives. It forces you to slow down, to tune your internal clock to the rise and fall of the tide, and to appreciate the ocean not just as a sports arena, but as a living, breathing ecosystem.

    Frequently Asked Questions

    Is solo surf travel safe for beginners?

    Yes, solo surf travel can be highly rewarding for beginners, provided you choose destinations with soft sand-bottom beach breaks and active surf schools, such as Tamarindo in Costa Rica or Weligama in Sri Lanka. It is highly recommended to stay at a dedicated surf camp where you have access to professional instructors and a built-in community to ensure your safety in and out of the water.

    How do I handle my valuables while surfing alone?

    This is one of the biggest challenges for solo travelers. Never leave your passport, electronics, or large amounts of cash in a bag on the beach. Use your accommodation’s security safe for high-value items. For your car keys, use a heavy-duty combination lockbox (such as a surf lock) attached to your vehicle’s tow hook, or carry a mechanical key on a lanyard inside your wetsuit key pocket.

    How do I avoid localism as a solo surf?

    The best way to avoid localism is to show profound respect. Paddle out slowly, sit on the shoulder, watch the rotation, and greet the locals with a genuine smile. Never drop in on anyone, never snake someone inside, and avoid paddling back out directly through the take-off zone. If a local expresses frustration, apologize immediately, do not argue, and give them plenty of space.

    What should I do if I get injured while surfing alone?

    Always identify the nearest medical facility or surf camp before you enter the water. Carry a basic first aid kit in your vehicle or day pack. In the water, if you find yourself in trouble, stay calm, float with your board, and signal for help by waving one arm slowly above your head. This is why staying at surf-centric accommodations is crucial; they notice if you do not return from a session.

  • Hello world!

    Welcome to WordPress. This is your first post. Edit or delete it, then start writing!

  • Best Surfboard Leashes Guide: How to Choose Your Lifeline in 2026

    Surfboard Leashes Guide: Choosing Your Lifeline in the Water

    A surfboard leashes is one of those things you don’t think about… until one fails you. And when it does, you remember it forever. In the surf world, we spend hours obsessing over the perfect board or the right set of fins, but we often treat the leash as an afterthought, a simple plastic cord to keep our board close.

    The truth is that your leash is a critical piece of safety equipment. It’s the only thing standing between a fun session and a dangerous situation for both you and everyone else in the lineup. If you’ve already picked out your essentials using our Surf Accessories You Actually Need Guide, it’s time to dive deep into the one accessory that literally saves lives.

    Why Your Leash is a Safety Essential

    I’ve had a leash snap on me, and of course, it wasn’t on a chill, easy day. It was a session with a bit more energy in the water, and I was surfing a spot with a significant distance to the shore. I wiped out, felt that sudden lightness on my ankle, and instantly knew.

    That “Sudden Lightness”: Lessons from a Long Swim

    You look around, and your board is just gone, getting pushed toward the “inside” by the whitewater while you’re stuck out the back. That swim back to shore teaches you real quick what a leash actually means. It’s not just about convenience; it’s about safety, positioning, and energy management. By the time I finally touched sand, I was completely exhausted. It made me realize I had been taking that little piece of gear for granted. Your leash keeps your “flotation device” attached to you; without it, you are just a swimmer in a heavy impact zone.

    Your Board as a Projectile

    Beyond your own safety, a surfboard leashes is about the responsibility you have toward others. A loose surfboard in a crowded lineup is a dangerous projectile. A snapped leash doesn’t just ruin your day; it could seriously injure another surfer. This is why choosing a high-quality leash and maintaining it is a non-negotiable part of surf etiquette.

    A surfer, in a 4/3mm black wetsuit with a tired, focused expression, treading water in deep, turbulent blue water past the impact zone. A thin, broken surfboard leashes string dangles from the tail plug of a white surfboard which is far in the distance, being swept shoreward by a massive, chaotic wall of whitewater.

    How to Choose the Right Leash (Length and Thickness)

    The reality is that you need very little to have a great session, but the few things you do need matter a lot. If you’ve already sorted your board and wetsuit using our How to Choose the Right Surfboard Guide you’re halfway there. Choosing a leash isn’t just about picking a color that matches your board, you need to match the leash to the size of your board and the power of the waves you’ll be surfing.

    Matching Your Board

    The golden rule is simple: Your surfboard leashes should be roughly the same length as your board.

    • If you ride a 6’0”, get a 6’0” leash.
    • If you ride an 8’0”, get an 8’0” leash.

    If the leash is too short, you risk the board recoiling and hitting you after a fall. If it’s too long, it creates unnecessary drag and makes it harder to retrieve your board quickly.

    Avoiding the “Competition Leash” Trap

    You’ll see super-thin “Comp” leashes on the rack. They look sleek, have less drag, and offer a “cleaner” feel. But honestly, for most surfers, they aren’t worth the risk. Competition leashes are designed for professional surfers in small, clean conditions where every millisecond of drag counts. For everyday sessions (especially if there is any size or power) they are risky. Less material means less strength. I’ve seen comp leashes snap way easier than standard leashes under normal pressure. Unless you are specifically pushing high-performance limits in tiny waves, stick to a “Regular” or “Standard” thickness cord (usually around 7mm).

    Ankle vs. Calf Attachment: Which is Right for You?

    Where you attach the leash to your leg depends entirely on the type of board you’re riding and your style of surfing.

    1. Standard Ankle Cuff: This is the go-to for shortboards and hybrid shapes. It provides the most control and keeps the board close to your center of gravity.
    2. The Calf (Knee) Leash: If you are longboarding, a calf surfboard leashes makes a lot of sense. Because longboarding involves moving up and down the deck (cross-stepping), a leash attached at the ankle often gets tangled around your feet. Attaching it higher up, just below the knee, keeps the cord clear of the deck and flows better with the “dance” of a bigger board.
    Ankle vs. Calf Attachment Which surfboard lashes is Right for You

    How to Know When Your surfboard Leashes is Done

    You should never wait for your leash to snap to replace it. Usually, a leash will start giving you “warning signs” before it fully fails. I’ve learned to spot these red flags together:

    1.  Fuzzy Velcro: When the velcro stops gripping cleanly and starts feeling “hairy” or weak, it’s done. If it can’t stay closed under the pressure of a small wave, it won’t hold in a big set.
    2. The “Noodle” Cord: If your leash is permanently stretched out and doesn’t recoil properly anymore, it has lost its structural integrity. A “stretched” surfboard leashes is a weakened leash.
    3. Squeaky Swivels: If the swivels at either end start squeaking, sticking, or showing signs of rust, that’s friction building up. Friction leads to heat and mechanical failure under pressure.

    If you notice a combination of these, don’t gamble. A new leash is much cheaper than a new board or a dangerous rescue.

    Surfboard Leashes Selection Guide

    Board TypeWave SizeRecommended LeashThickness
    Shortboard2ft – 5ft6ft Regular / Comp5mm – 7mm
    Hybrid / Fish3ft – 6ft6ft or 7ft Regular7mm
    Longboard2ft – 6ft 9ft or 10ft Calf7mm – 8mm
    Big Wave / Step-up8ft+Heavy Duty / Big Wave8mm+

    Don’t Take Your Lifeline for Granted

    A surfboard leash is a simple piece of equipment that plays a massive role in your safety. You don’t need the fanciest, most expensive version, but you do need one you can trust. Pay attention to the “signs of death,” avoid the lure of ultra-thin comp leashes for your daily driver, and always match the length to your board.

    The moment a surfboard leashes breaks is the moment you realize just how far you are from the beach. Treat your leash with respect, and it will keep you and your board safe for many sessions to come.

    Frequently Asked Questions

    How do I install a leash string correctly?

    The “leash string” (the small cord that attaches to the board) should be short enough that the “rail saver” (the thick fabric part of the leash) sits across the rail of the board when pulled tight. If the string is too long, it can act like a cheese-wire and cut through the tail of your board during a heavy wipeout.

    Should I take my surfboard leashes off after every session?

    Yes. Leaving a leash wrapped tightly around the tail of your board can cause the cord to develop “kinks” or “memory,” making it more likely to tangle around your feet next time you surf. Rinse it with fresh water and hang it loosely.

     Is it okay to use an old leash on a new board?

    If the surfboard leashes shows any of the “signs of death” (fuzzy velcro, stretched cord), replace it. A $30 leash is a small price to pay to protect a $600+ new surfboard.

  • When Should You Replace Your Surfboard? 4 Signs You Need an Upgrade

    When Should You Replace Your Surfboard? Signs Your Board is Holding You Back

    Knowing when to replace your surfboard is one of those things you don’t really understand until you’ve felt the difference between a board that’s alive… and one that’s just done.

    Whether it’s because the board is physically falling apart or because your skills have moved past what the board can offer, riding the wrong craft is the fastest way to kill your progression. If you’re wondering if your current setup is the problem, you’ve likely already hit the “Progression Wall.”

    Before you pull the trigger on a new purchase, make sure you’ve checked our Surfboard Volume Explained Guide to ensure your next move is the right one. Otherwise, here is how to tell if it’s time to say goodbye to your current board.

    The “Dead Board” Syndrome: Has Your Board Lost Its Soul?

    I’ve definitely ridden boards that looked fine on the outside but felt completely dead under my feet. There was no spark, no response, and absolutely no “pop” when trying to push through a turn.

    At first, I thought it was just me having a bad session. But then you hop on a fresher board and it’s like everything wakes up again. Surfing isn’t just about foam; it’s about flex.

    Loss of Pop and Flex: The Silent Killer

    Surfboards are designed to act like a spring. When you push into a turn, the board flexes and then “snaps” back, projecting you forward with speed. Over years of use, the fiberglass and foam lose that elastic memory. The board becomes “soft.” If you find yourself struggling to generate speed on waves that used to feel fast, your board might have simply lost its life.

    Yellowing and Waterlogging

    If your board has turned a deep shade of yellow or feels significantly heavier than the day you bought it, it’s likely waterlogged. Even “watertight” boards take on microscopic amounts of moisture over time through pressure dings and old repairs. A heavy, water-saturated board sinks lower in the water, paddles slower, and loses the buoyancy you need to stay on top of the wave.

    The Progression Wall: When You’ve Outgrown the Shape

    Sometimes the board is in perfect condition, but you are the one who has changed. I stayed on certain boards (especially bigger funboards and foamies) way longer than I should have.

    At the beginning, a big board is your best friend. It’s stable and helps you build confidence. But eventually, you reach a point where you stop struggling to stand up and start wanting more from the wave. Signs you’ve outgrown your board:

    • You feel like the board is “slow” to react when you try to turn.
    • The board feels “clunky” when you’re trying to trim across the face of the wave.
    • You’re catching every wave easily but feel “stuck” in a straight line.

    If you change boards too early, you’ll slow your progression down by falling more. But if you change too late, you’ll plateau. When the board starts feeling like a hurdle rather than a tool, it’s time to downsize or look for a more refined shape.

    When Should You Replace Your Surfboard? Learn the signs of a "dead" surfboard, how to spot waterlogging, and when it’s time to move past your beginner board.

    The “New vs. Used” Debate: A Strategic Approach

    When it’s time for an upgrade, don’t feel pressured to buy a brand-new, sparkling white board off the rack. While that fresh “pro” feel is amazing, a brand-new board comes with a higher price and, honestly, a bit of psychological pressure.

    The First Ding Syndrome: We’ve all been there,the first ding on a $800 board hurts way more than it should. That stress can actually make you surf more tentatively.

    Why Lightly Used is Often Smarter

    For a progressing surfer, a lightly used board is often the smartest move. You can get a high-quality, name-brand board for a fraction of the cost.

    What to look for: Avoid boards with “soft spots” (where the fiberglass feels squishy) or major repairs around the fin boxes.

    What’s okay: Minor cosmetic marks or “pressure dings” (slight heel dents) on the deck are totally fine and won’t affect performance.

    A used board allows you to push yourself harder because you aren’t terrified of a little scratch. It’s about the connection and the possibility, not the price tag.

    The Surfboard Retirement Checklist

    SignalDiagnosisAction
    Heavy/YellowedWaterlogged foam core.Replace. It’s a literal anchor now.
    Cracks in Fin BoxesStructural failure at a stress point.Repair if high-end; Replace if entry-level.
    Dead” feeling/No speedLoss of fiberglass flex/memory.Replace. You can’t fix “dead” foam.
    Catching waves is “Too Easy”Outgrown the volume/length.Upgrade. Move to a smaller, more responsive shape

    Trust the Feeling

    At the end of the day, replacing your board isn’t just about damage or age, it’s about your relationship with the ocean. If the board feels dead, if it’s not responding to your input, or if you’ve clearly hit a wall in your turns, it’s time to move on.

    When you step onto the right “next” board, you’ll feel it immediately. More life, more response, and a sudden realization of what you’ve been missing. Trust that feeling.

    Frequently Asked Questions

    How long does an average surfboard last?

    For a casual surfer, a well-maintained PU (polyurethane) board usually lasts 3 to 5 years before it loses its “pop.” Epoxy boards tend to stay “fresh” a bit longer due to the nature of the resin.

    Can I fix a waterlogged board?

    Not really. You can dry it out and seal the leaks, but once the foam has absorbed a significant amount of water, the internal cells are damaged. It will never have the same buoyancy or flex again.

    Is it worth repairing a snapped board?

    Only if it’s a high-value or sentimental board. A snapped board will always have a “dead spot” where the repair was made, and the weight distribution will be permanently altered.

  • Surfboard Volume Explained: Why Liters Are Only Half the Story

    Surfboard volume is one of those topics that sounds incredibly technical, but once you’ve been in the water long enough, you realize it’s both vital and a little overhyped at the same time.

    If you’ve spent any time in a lineup, you’ve probably heard surfers arguing over one or two liters of volume like it’s life or death. They talk about numbers like they’re tuning a race car, saying things like, “This board is 31.5 liters, but I usually ride 30.8,” as if that tiny difference is the magic key to a perfect session.

    While those small adjustments matter for pros, for most of us, volume is a guide—not a guarantee. Before you get lost in the math, make sure you understand the basics in our How to Choose Surfboard Size Guide. If you’re ready to look past the numbers, here is the truth about surfboard volume.

    The “Surfboard Volume Lie”: Why Identical Liters Feel Different

    I’ve owned two boards with almost identical volume (same liters, similar length) where one felt like a dream and the other felt like a brick. One was alive, responsive, and easy to paddle; the other was slow, awkward, and impossible to position.

    This is what I call the Volume Lie. Volume tells you how much a board floats, but it doesn’t tell you how it will feel under your feet or under your chest when you’re paddling.

    Two boards can carry the exact same 35 liters, but the way that foam is distributed,through the nose, under your chest, or in the rails, changes everything. If the foam is concentrated under your chest, the board will glide into waves effortlessly. If it’s shoved into chunky rails or an oversized tail, it might feel “corky” and difficult to control. Volume is just a measurement of displacement; distribution is what dictates performance.

    Surface Volume

    The Magic of “Hidden Volume”

    We’ve all seen those boards,the ones that look sleek, thin, and high-performance, yet they stay high on the water and catch everything. This is “Hidden Volume”.

    Smart shapers know how to hide foam where you actually need it (usually under the chest for paddling) while keeping the rails tapered and the nose refined. It’s the ultimate “cheat code” for surfers who want a board that looks like a sports car but paddles like an SUV. It’s not just about cramming foam into a board; it’s about placing it where it actually helps you stay stable and get into waves early.

    Volume Distribution: How Foam Affects the Ride

    Foam PlacementThe FeelingBest ForThe Drawback
    Under the Chest “The Paddle Hack”Catching waves early and easy gliding.Can make the front of the board feel “heavy” in turns.
    In the Rails“The Safety Net”Extra stability and forgiveness during turns.Thick rails are harder to “sink” into the wave face for grip.
    In the Tail“The Turbo”Maintains speed through flat or weak sections.Can make the board feel “bouncy” in powerful surf.

    Beyond the Number: Rocker, Rails, and Outline

    When I hear people obsessing over a one-liter difference, I realize they might be missing the bigger picture. Volume is a great starting point to ensure you aren’t sinking, but it’s heavily influenced by other factors:

    1. Rocker: A board with a lot of curve (rocker) pushes more water and can feel like it has “less” volume when paddling than a flat board.
    2. Outline: A wide, round nose adds a level of stability that liters alone can’t describe.
    3. Fitness: A pro might ride 28 liters because their technique is perfect, but a beginner might need 80 liters to achieve the same result.

    The Bottom Line

    The best board I’ve ever ridden wasn’t the one with the “perfect” volume number on the stringer. It was the one that felt right in the water, easy paddle, smooth takeoff, and responsive when I needed it.

    Until you get a board in the ocean and feel how it moves, volume is just a number. Use it to find your “safety margin,” but don’t let a decimal point talk you out of a board that feels like magic.

    Frequently Asked Questions

    What exactly is surfboard volume?

    Volume is a measurement (typically in liters) of the total amount of space the interior of a surfboard occupies. It is calculated by multiplying length, width, and thickness, adjusted for the board’s specific shape and curves.

    Why do beginners need high-volume boards?

    Beginners need high volume because it provides maximum buoyancy. This keeps the board high on the water, making it significantly easier to paddle, catch waves, and maintain balance during the pop-up.

    Can a board have too much volume?

    Yes. If a board has too much volume for your weight or the wave conditions, it can feel “corky” or bouncy. This makes it difficult to engage the rails of the board in the water to make a turn, especially in larger or more powerful waves.

  • How to Choose Surfboard Size: Why the Charts are Usually Wrong

    Surfboard size is one of those things that looks incredibly straightforward on paper and then completely falls apart in real life. If you search for a size chart, you’ll find plenty of tables telling you exactly how many liters of volume you need based on your weight.

    I once followed those charts to the letter. I bought a board that was technically “perfect” for my weight—the liters matched, the length made sense, and the chart said it was my ideal match. Then I took it out and couldn’t catch a single wave. I was paddling my heart out and missing everything, or catching waves so late that I got dropped instantly.

    That was a frustrating, expensive lesson: charts don’t account for your actual skill level, your paddling fitness, or the margin of error you need to actually succeed. Before you buy, make sure you’ve read our How to Choose the Right Surfboard Guide to understand the basics. If you’re ready to find your specific size, here is how to avoid the “perfect on paper” disaster.

    The “Perfect on Paper” Disaster

    The biggest mistake beginners make with size charts is treating them like strict rules instead of rough guidelines. Most online charts lean toward advanced surfers who already have elite paddling technique and perfect timing.

    When I stopped trying to match numbers and started paying attention to feel, everything changed. I had my “Goldilocks” moment when I picked up a board that was significantly bigger than what the charts suggested for my weight. It had more volume, more width, and more length.

    From the first paddle, it just clicked. I could glide into waves earlier, I had time to think during my pop-up, and I wasn’t fighting just to stay balanced. Everything slowed down in the best way possible. The right size isn’t about being technically “correct” according to a math formula; it’s about giving yourself enough of a safety margin to actually catch waves.

    Volume vs. Dimensions: Why Length and Width Matter

    While everyone talks about “liters” (volume), the actual dimensions—length, width, and thickness—dictate how stable that volume feels. A 40-liter shortboard and a 40-liter funboard will feel completely different in the water.

    For beginners, width is your best friend. A wider board provides a more stable platform for your pop-up, preventing the “wobble” that causes so many falls. Similarly, extra length helps with “glide,” allowing the board to start moving before the wave even reaches you.

    Real-World Sizing Guide: The “Safety Margin” Table

    This table is designed for beginners and early intermediates. It adds a “safety margin” of volume to ensure you actually catch waves rather than sinking.

    Your WeightRecommended Volume (Beginner)Recommended Board LengthWhy This Size?
    50–60 kg60–70 Liters7’6″ – 8’0″Provides maximum float for lighter frames without being too heavy to carry.
    60–75 kg 70–85 Liters8’0″ – 8’6″The “Goldilocks” zone for most adults; high stability and easy paddling.
    75–90 kg85–100+ Liters8’6″ – 9’4″Essential for maintaining buoyancy and catching waves in smaller surf.
    90 kg+100+ Liters9’6″+ Large longboards or “Super-Foamies” are required to keep you high on the water.

    The 3 Biggest Sizing Mistakes (And How to Fix Them)

    1) The Ego Trap: Sizing Down Too Early

    Many beginners want to move to a smaller board because they think it makes them look more experienced. The irony is that you look like a much better surfer when you are actually standing up and riding a wave on a big board, rather than struggling and sinking on a tiny one.

    2) Ignoring Your Local Wave Conditions

    If you mostly surf small, “mushy” waves, you need a bigger board regardless of what the weight chart says. Larger boards carry momentum through weak sections of water where smaller boards would simply bog down and stop.

    3) Treating Volume as a Strict Rule

    If you are struggling to paddle, constantly missing waves, or feeling off-balance, your board is too small for where you are right now. Don’t be afraid to go 5 or 10 liters above what the “pros” suggest. More waves lead to more practice, and more practice leads to faster progression.

    Finding Your “Goldilocks” Board

    The goal in the beginning isn’t high-performance maneuvers; it’s giving yourself the best possible chance to actually surf. When the board size is right, you feel it immediately. It should feel manageable, not like a constant battle.

    If you are looking for specific recommendations that fit these size profiles, check out our guide to the Best Surfboards for Beginners in 2026. Stop chasing the “perfect” number and start chasing the board that actually lets you stand up.

    Frequently Asked Questions

    Can a surfboard be too big for a beginner?

    While it’s rare, a board can be too big if you physically cannot carry it to the water or if it is so wide that you cannot reach your arms around it to paddle effectively. However, 99% of beginners struggle because their board is too small, not too large

    How do I know if my surfboard has enough volume?

    When you are lying on the board in neutral water, your chest should be well above the surface, and the nose of the board should not be underwater. If the board is sinking significantly while you are just floating, you need more volume.

    Does my height matter as much as my weight for board size?

    Weight is the primary factor for buoyancy (volume), but height matters for stability. Taller surfers have a higher center of gravity, meaning they often need a wider board to help them maintain balance during the pop-up and while riding the wave.

  • Soft Top vs. Hard Top Surfboards: The Humbling Truth About Transitioning

    The jump from a soft top to a hardboard is one of those moments in surfing you never forget—mostly because it humbles you instantly.

    For months, you’ve been the king of the foamie. You’re catching waves, standing up consistently, and feeling like a “real” surfer. Then, you paddle out on a fiberglass or epoxy hardboard for the first time, and suddenly, you feel like a day-one beginner all over again.

    What I learned the hard way is that moving to a hardboard isn’t just an upgrade in equipment; it’s a complete recalibration of your muscle memory. Before you make the switch, make sure you’ve mastered the basics in our How to Choose the Right Surfboard Guide

    If you are ready for the challenge, here is the honest truth about the transition from foam to fiberglass.

    The First Paddle: Why a Hardboard Feels “Alive” (and Unstable)

    The first time I paddled a hardboard, the difference was immediate. It felt faster—no doubt about it. The board had more glide, cutting through the water instead of dragging over it. When I caught a wave, the board responded way quicker to every shift in my weight.

    But there was a catch: it felt incredibly unstable.

    On a soft top, you can be a bit sloppy with your balance and still stay on your feet. The foam deck acts like a stable platform that forgives your mistakes. On a hardboard, that safety net is gone. Every little error in your positioning or pop-up shows up instantly. It stops feeling like a platform and starts feeling like something alive under your feet. You have to be precise, or it will buck you off.

    Goodbye Safety Net: The Mental Shift of Wiping Out

    There is a psychological comfort to a foam board that you don’t realize you have until it’s gone. On a soft top, you fall, you laugh, and you climb back on. The deck is soft, the fins are usually plastic, and the stakes feel low.

    Wiping out on a hardboard hits differently. Suddenly, you are hyper-aware of where the board is, where those razor-sharp fiberglass fins are, and exactly how you are hitting the water.

    That mental shift makes you hesitate. You might find yourself paddling a bit more cautiously or committing less to a steep drop because you’re afraid of the impact. In surfing, hesitation usually means you miss the wave or fall. Learning to trust yourself on a hard, fast projectile is one of the biggest mental hurdles of the transition.

    Quick Comparison: Soft Top vs. Hard Top at a Glance

    FeatureSoft Top (Foamie)Hard Top (Fiberglass/Epoxy)
    Primary GoalLearning and funPerformance and progression
    The FeelStable, forgiving “platform”Reactive, fast, “alive”
    DurabilityHigh (hard to ding)Low (cracks easily)
    SafetyHigh (soft deck/fins) Moderate (fins/rails can be sharp)
    PaddlingHigh drag, high floatLow drag, high glide

    The 3 Biggest Technical Hurdles You’ll Face

    1) Narrower Rails & The Balance Trap

    Most hardboards have narrower, more refined rails than a chunky foamie. This makes the board much more sensitive to where you place your feet. If your pop-up isn’t centered, the board will rail-flip or wobble instantly. You have to move from “standing up” to “landing precisely.”

    2) Mastering the Duck Dive

    On a big soft top, you don’t really duck dive; you usually just “turtle roll” or push through the whitewater. With a hardboard, you are expected to sink the board cleanly under the wave. Mastering the timing and the “scoop” of a duck dive takes weeks of practice and a lot of saltwater up the nose, but it’s the only way to get out back efficiently.

    3) Overcoming the “Hesitation” Factor

    Because the board is less forgiving, your brain will tell you to play it safe. You’ll find yourself pulling back on waves you could have caught. The only way past this is repetition. You have to fall a few times to realize that while the board is hard, you are still in control. Commitment is the only way to make a hardboard work for you.

    When is the Right Time to Make the Switch?

    Don’t rush to leave your soft top. It builds your foundation, your confidence, and your wave-counting stats. A hardboard demands precision, but it only rewards you if you have the skills to handle the speed.

    When you can consistently turn both ways and you feel like the “drag” of the foam is holding back your speed, that is the moment to level up. Just be prepared to be humbled for a few sessions—it’s all part of the process.

    Frequently Asked Questions

    Are hardboards faster than soft tops?

    Yes. Fiberglass and epoxy resins create a much smoother, harder surface than foam. This reduces friction and drag against the water, allowing the board to glide faster and maintain more speed through turns.

    Will a hardboard help me turn better?

    Eventually, yes. Hardboards have “hard rails” (sharper edges) that bite into the face of the wave, giving you much more control during a turn. However, because they are more sensitive, you need better foot placement and balance than you did on a soft top.

    Should I keep my soft top after I buy a hardboard?

    Absolutely! Every surfer should have a “fun foamie” in their quiver. They are perfect for small, crowded summer days or for when you just want to relax and catch 20 waves without the pressure of performance.

  • Best Surfboards for Beginners in 2026 (The “Cheat Code” Guide)


    When people ask me about the best surfboards for beginners, I always laugh a little, because I had to learn this lesson the hard way. When I started, I thought the board didn’t matter that much and that skill was everything. I was completely wrong.

    After years of surfing and watching new surfers progress, I am convinced that the board you start on can completely change how fast you learn. The right beginner board feels almost unfair—you catch more waves, you stay on your feet longer, and you build confidence twice as fast.

    Before you drop any money on equipment, make sure you understand the baseline of what you need by reading our How to Choose the Right Surfboard Guide. But if you are ready to buy your first board this year, here is exactly what to look for, what to avoid, and the best beginner surfboards of 2026.

    The “Beginner” Hardboard Trap (How I Got Bruised Ribs)

    I made the classic mistake of buying a board with my eyes instead of my brain. At one point, I tried what was marketed as a “beginner” hardboard. It was fiberglass with shiny rails—the kind of board that makes you feel like a “real” surfer walking down the beach.

    The problem was that “beginner” is a label that brands sometimes use very loosely. This board had way less volume and much sharper rails than I was ready for. Every wipeout hurt. Every time I paddled, the nose would dive or the board would wobble uncontrollably. Because it was hard fiberglass instead of foam, I ended up with bruised ribs more than once just from paddling.

    That painful experience taught me that looking cool on the sand means nothing if you are getting beaten up in the water.

    The Cheat Code Formula: What Actually Makes a Good Beginner Board?

    The turning point came when I swallowed my pride and jumped on a classic 8-foot foamie (soft top). I thought it looked kind of ridiculous compared to the sleek fiberglass boards in the lineup, but my first session made me realize something: that board was basically a cheat code.

    Here is the exact formula that makes a beginner surfboard actually good:

    1. Massive Volume (80–86 Liters): A board that floats you well is your single biggest advantage. High volume lets you paddle faster and catch waves effortlessly.
    2. Width and Length (Around 8 Feet): You need an 8-foot board with a wide nose. This gives you a massive, stable platform when you are executing your pop-up.
    3. Soft Materials: Foam decks and soft plastic fins are non-negotiable for safety. They protect you, and everyone around you, when you inevitably lose control.
    4. Carrying Handles: It sounds like a small detail, but when you are walking down the beach with jelly arms after an exhausting session, a built-in carrying handle suddenly feels like a brilliant design choice.

    Quick Comparison: Top Beginner Surfboards in 2026

    Surfboard ModePrice (Est.)Best FeatureThe Vibe
    Catch Surf LOG 8’0~€499Premium durability and classic style.The gold standard of foamies; incredibly buoyant.
    Ocean & Earth Ezi-Rider 8’0~€425High-density foam and excellent grip.The workhorse; built to survive absolute abuse.
    Quiksilver Break 8.0~€395Great shape and reliable performance.The balanced option from a trusted surf brand.
    Generic 8ft Mini Mal Foamie~€207Unbeatable price for first-timers.The budget entry-level; perfect if funds are tight.

    The Best Beginner Surfboards to Buy This Year

     1) Catch Surf LOG 8’0 Softboard

    If you want the premium standard of beginner boards, this is it. The Catch Surf LOG packs an absurd amount of volume, making it an absolute wave-catching machine. It has stiffer stringers inside, meaning it won’t flex and bend like cheaper foamies, giving you a surprisingly smooth ride as you start learning to turn.

    2) Ocean & Earth Ezi-Rider 8’0 Softboard

    Ocean & Earth is known for making bomb-proof gear, and the Ezi-Rider is no exception. This board is the definition of a “cheat code.” It is exceptionally wide, incredibly stable, and uses a high-density foam deck that resists getting chewed up over time. If you want a board that will last you years, this is a fantastic investment.

    3) Quiksilver Break 8.0 Softboard

    This is the perfect middle-ground board. It sits at a great price point and comes from a legacy surf brand that knows exactly how to shape a board. It provides the massive volume required for early wave catching but has slightly more refined rails, which helps you progress into your first real turns without feeling like you are driving a boat.

    4) 8ft Soft Foamie Beginner Mini Mal (Budget Option)

    If you are on a strict budget, you don’t need to spend €500 to get into the water. A generic 8-foot foam Mini Mal around the €200 mark will still provide the massive volume and soft, forgiving deck you need to safely learn your pop-up. It might not last as many seasons as the premium brands, but it will absolutely get you standing up on your first waves.

    Match Your Board to Your Body

    At the beginning, your surfboard isn’t just a piece of equipment—it is your biggest teacher in the water. Choose the board that forgives your mistakes and helps you progress.

    Now that you know what boards to look for, you need to make sure you are buying the exact right size for your height and weight. Stay tuned for our upcoming guide on How to Choose Surfboard Size, where we will break down exactly how many liters of volume you personally need to succeed!

    Frequently Asked Questions

    Why shouldn’t a beginner buy a fiberglass surfboard?

    Fiberglass surfboards (hardboards) generally have less volume, making them harder to paddle and balance on. More importantly, they are hard and have sharp fins. When a beginner inevitably wipes out or loses control of their board, a fiberglass board can cause serious injuries (like bruised ribs or cuts) to the surfer and anyone else in the water.

     What is surfboard volume and why does it matter?

    Volume is a measurement (in liters) of how much space a surfboard takes up. It determines how buoyant the board is. For a beginner, high volume (usually 70 to 90 liters) is crucial because it keeps the board floating high on the water, significantly reducing paddle fatigue and making it much easier to catch waves.

    Can I learn to surf on a 7-foot board?

    While it is possible, starting on a 7-foot board makes the learning curve much steeper for the average adult. An 8-foot foamie provides a much larger “sweet spot” for your pop-up and better glide. Only very light individuals or young children should consider starting on a board smaller than 8 feet.

  • What to Wear Surfing in Different Water Temperatures (A Survival Guide)

    When you first start surfing, it is easy to look at wetsuits as just a style choice or a minor detail. I used to think that if I could just tolerate the cold for a few minutes, my body would adjust and that would be enough.

    The ocean corrected that thinking pretty quickly. What you wear surfing isn’t about style—it is about survival, energy preservation, and performance.

    If you wear the wrong gear, every paddle becomes a miserable struggle. After years of trial and error, freezing feet, and brutal rashes, here is the absolute truth about what to wear surfing in different water temperatures.

    The Golden Rule: Air Temperature Means Absolutely Nothing

    I made this classic rookie mistake early on. It was a beautiful, sunny, windless day, so I convinced myself it wouldn’t be “that bad” and paddled out in just boardshorts.

    Ten minutes in, my legs were entirely numb. Twenty minutes in, I could barely feel my feet pressing against the deck of my board. My paddling felt weak, slow, and totally disconnected. I had to get out of the water early, shivering uncontrollably and incredibly frustrated.

    That day taught me the most important rule of surf gear: Air temperature means nothing. Water temperature is everything. Cold water drains your energy incredibly fast, and once your core temperature drops, your session is basically over. You dress for the water, not the weather.

    The Surfer’s Temperature Guide (Thickness Explained)

    Neoprene thickness isn’t random; it is highly strategic. Wetsuits are measured in millimeters (e.g., 3/2mm means 3mm of neoprene on the chest/back for core warmth, and 2mm on the arms/legs for flexibility)

    Warm Water (Above 20°C / 68°F): Boardshorts & Spring Suits

    If you are surfing in tropical water, you don’t need thick neoprene. Boardshorts (or a bikini/swimsuit) paired with a UPF rash guard to protect your skin from the sun and the wax on your board is perfect. If the water has a slight chill or the wind is blowing, a 2mm “spring suit” (short arms and short legs) will keep your core warm without restricting your movement.

    If the water has a slight chill or the wind is blowing, a 2mm "spring suit" (short arms and short legs) will keep your core warm without restricting your movement.

    Mild Water (15°C to 20°C / 59°F to 68°F): The Classic 3/2mm Wetsuit

    This is the most versatile wetsuit in the world. A full-length 3/2mm suit provides the perfect balance. It gives you enough core warmth to stay in the water for hours, but the 2mm arms still allow you to paddle freely without exhausting your shoulders.

    the most versatile wetsuit in the world. A full-length 3/2mm suit provides the perfect balance

    Cold Water (Below 15°C / 59°F): The 4/3mm (And Avoiding the “Boiling” Mistake)

    When the water gets cold, you need a 4/3mm suit, and occasionally neoprene booties and a hood. However, you must be careful not to overdo it.

    I once wore a thick winter suit on a warm spring day because I wrongly assumed the water was still freezing. Within fifteen minutes, I felt like I was cooking inside a rubber prison. I was overheating, sweating profusely, and I became exhausted way too quickly. Thick neoprene is a lifesaver when you need it, but when you don’t, it becomes a massive liability. Surfing demands a lot of energy; if your body is overheating, your performance drops to zero.

    When the water gets cold, you need a 4/3mm suit, and occasionally neoprene booties and a hood. However, you must be careful not to overdo it.

    The Cheap Wetsuit Trap: Why Fit is Everything

    At one point, I decided to buy a cheap wetsuit simply because it was on sale and I didn’t want to spend the money on a premium one. It was a terrible decision.

    Because it didn’t fit properly, it flushed with freezing cold water every time I duck dived under a wave. The cheap neoprene was stiff in the shoulders, making it incredibly hard to paddle, and worst of all, it gave me a brutal, stinging rash around my neck and under my arms. I spent the whole session focused on my discomfort instead of the waves.

    That taught me that fit matters way more than the brand. A good wetsuit should feel like a second skin—snug, but not restrictive, with no big air gaps and no excess folds. Quality neoprene is not something you cut corners on.

    You Have the Gear, Now Get the Skills

    The right gear doesn’t just keep you comfortable. It extends your session, protects your skin, preserves your energy, and lets you actually focus on reading waves and improving your technique.

    Once you have the right suit and you are ready to stay in the water for hours, you need to make sure your fundamental skills are sharp enough to make use of that time.

    Before you paddle out, head over to our Ultimate Guide to Surfing for Beginners: How to Start and Not Give Up. It covers all the essential techniques—from the perfect pop-up to reading the lineup—so that once you are warm and comfortable, you can actually start catching waves.

    Frequently Asked Questions About Surf Gear

    What does 3/2mm or 4/3mm mean on a wetsuit?

    These numbers refer to the thickness of the neoprene in millimeters. The first number (e.g., the “3” in 3/2) is the thickness around your chest and back to keep your vital organs warm. The second number (the “2”) is the thickness on your arms and legs, which is slightly thinner to allow for flexibility while paddling.

    Should my wetsuit feel tight when I try it on dry?

    Yes. A wetsuit should feel very snug—almost uncomfortably tight—when you try it on in a store. Neoprene loosens up and expands slightly once it gets wet. If a wetsuit feels loose or has folds of extra material when it is dry, it will fill with cold water in the ocean and drag you down.

    How do I stop my wetsuit from giving me a neck rash?

    Neck rashes usually happen when a wetsuit doesn’t fit correctly or when salt crystals get trapped between the rubber and your skin. To prevent it, ensure your suit is a snug fit, and apply a specialized anti-chafe balm (or even plain petroleum jelly) around your neck before you paddle out.

  • Surf Safety Tips for First-Time Surfers (Learned the Hard Way)

    If there is one thing I wish someone had drilled into me from day one, it’s that surf safety isn’t optional. When you are a first-time surfer, you are so hyper-focused on trying to stand up that you don’t realize how many small decisions can quickly turn into big problems.

    The ocean doesn’t need to be huge to be powerful, and it certainly doesn’t give warnings in words. It teaches through experience. I definitely learned my safety lessons the hard way—getting tumbled, smacked, and dragged—but you don’t have to.

    If you want to progress faster, avoid unnecessary injuries, and actually enjoy your time in the water, here are the absolute must-know surf safety tips, born directly from my own rookie mistakes.

    Tip #1: Observe Before You Enter (Safety Starts on the Sand)

    One of the biggest mistakes beginners make is running straight from the car into the water. What I’ve learned after all these years is that safety in surfing starts before your toes even touch the ocean.

    Take ten minutes to stand on the beach and just watch. Check the conditions. Is the tide coming in or going out? Where are the experienced surfers paddling out, and more importantly, where are they exiting the water? Look for rocks, piers, or areas where the water looks chaotic. If you don’t take the time to study the environment you are about to play in, you are already putting yourself at a disadvantage.

    Women observing the waves before to start the surf session

    Tip #2: Beware the “Easy” Paddle Out (Understanding Rip Currents)

    I remember paddling out one day and thinking, “Nice, this is incredibly easy. I’m barely paddling and I’m already so far out!” I had paddled straight into a rip current without even realizing it. What I didn’t understand at the time was that this fast-moving water heading out to sea isn’t your friend; it’s a conveyor belt. Suddenly, I was way deeper than I intended to be, slightly panicking, and burning all my energy trying to paddle straight back to the beach without going anywhere.

    The Fix: You never fight a rip current directly back to shore. You stay calm, save your energy, and paddle parallel to the beach until you are out of the pull, then let the breaking waves wash you in. Even better, learn to avoid them entirely by spotting the darker, choppier channels of water where the waves aren’t breaking—that is usually where the rip is pulling out.

    never fight a rip current directly back to shore. You stay calm, save your energy, and paddle parallel to the beach until you are out of the pull

    Tip #3: Protect Your Head from Your Own Board (Always)

    Getting hit by your own board hurts your body, and it definitely hurts your pride.

    Early on, I wiped out on a wave and immediately popped my head above the surface to grab a breath. I didn’t cover my head. The board had been sucked backward by the wave, and my leash acted like a giant rubber band, snapping the board straight back at my face. Luckily, the fins missed me and it wasn’t serious, but it easily could have been.

    The Fix: Since that day, my reaction is automatic. When you fall off your board, always stay underwater for an extra second, and always surface slowly with your arms wrapping your head and face. Your surfboard is heavy, it has sharp fins, and in moving water, it is totally unpredictable. Never assume it isn’t flying right toward you.

    always stay underwater for an extra second, and always surface slowly with your arms wrapping your head and face.

    Tip #4: Never Underestimate “Small” Waves

    People tend to think surf safety is only something you worry about when the waves are massive. That is a dangerous illusion. Small waves breaking over a shallow sandbar can severely mess you up.

    I remember getting caught inside by what looked like a completely harmless, waist-high wave. But it pitched faster than I expected, caught me off guard, and slammed me directly into the bottom, rolling me over the sandbar. Because the water was so shallow, there was no cushion. I came up coughing with sand in my mouth and a brand-new respect for “fun-sized” conditions.

    The Fix: Power isn’t just about the height of the wave; it’s about how and where it breaks. Always protect your neck when falling in shallow water by falling flat (like a starfish) rather than diving headfirst.

    Small waves breaking over a shallow sandbar can severely mess you up.

    Tip #5: Don’t Fight the Ocean (And Don’t Panic)

    The golden rule of surfing is that the ocean always wins. If you get held underwater after a wipeout, your instinct will be to thrash around and fight your way to the surface. This only burns the oxygen in your lungs and induces panic.

    Relax. Let the wave roll over you. The turbulence only lasts for a few seconds, and your wetsuit and surfboard (attached to your ankle) both act as flotation devices. Surfing is incredible freedom, but it is a freedom that only works when you respect your limits and stay calm under pressure.

    Surfing is incredible freedom, but it is a freedom that only works when you respect your limits and stay calm under pressure.

    Master the Fundamentals to Stay Safe

    The best way to stay safe in the water is to know exactly what you are doing before you paddle out into the lineup. Good technique is the ultimate safety gear.

    If you want to ensure you know how to handle your board properly, how to position your weight so you don’t wipe out dangerously, and how to navigate the waves with confidence, head over to our Ultimate Guide to Surfing for Beginners: How to Start and Not Give Up. Mastering those foundational skills will keep you out of trouble and help you actually enjoy the ride.

    Frequently Asked Questions About Surf Safety

    What should I do if I get held underwater by a wave?

    The most important thing is to stay calm and not panic. The typical “hold down” for a beginner wave lasts less than 5 seconds, even if it feels much longer. Cover your head with your arms, let the turbulence pass, and once the spinning stops, grab your leash and pull yourself gently up to the surface.

    Why do I need to wear a leash?

    A leash connects your ankle to your surfboard. It is your most important piece of safety equipment for two reasons: First, your board acts as a giant life preserver that you can always pull yourself back to. Second, it prevents your heavy board from washing freely toward the beach and hitting other surfers or swimmers in the head.

     Is it safe to surf alone as a beginner?

    No, beginners should never surf entirely alone. Always surf at a beach where there are lifeguards present or where other surfers are in the water. If you get caught in a rip current, suffer a cramp, or hit your head, having people nearby can be life-saving.